When building full-stack applications, one crucial aspect is ensuring secure and efficient authentication and authorization (user auth). During my recent project combining FastAPI on the backend and Next.js on the frontend, I encountered a common yet challenging question: How do I securely manage user sessions and protect backend endpoints effectively? Given the overwhelming number of available solutions, I couldnt find anything that perfectly suited my needs. I experimented extensively and finally developed a clean, scalable method tailored to integrating FastAPI and Next.js. In this guide, I'll share my approach to implementing secure, robust JWT-based authentication and authorization.
Overview: Strategy
The strategy centers around three main principles:
- JWT-based Authentication for stateless and secure user sessions.
- Using HTTP-only cookies for storing JWT tokens securely on the client.
- Leveraging FastAPI Dependency Injection and Next.js App Router for seamless integration and protection of routes.
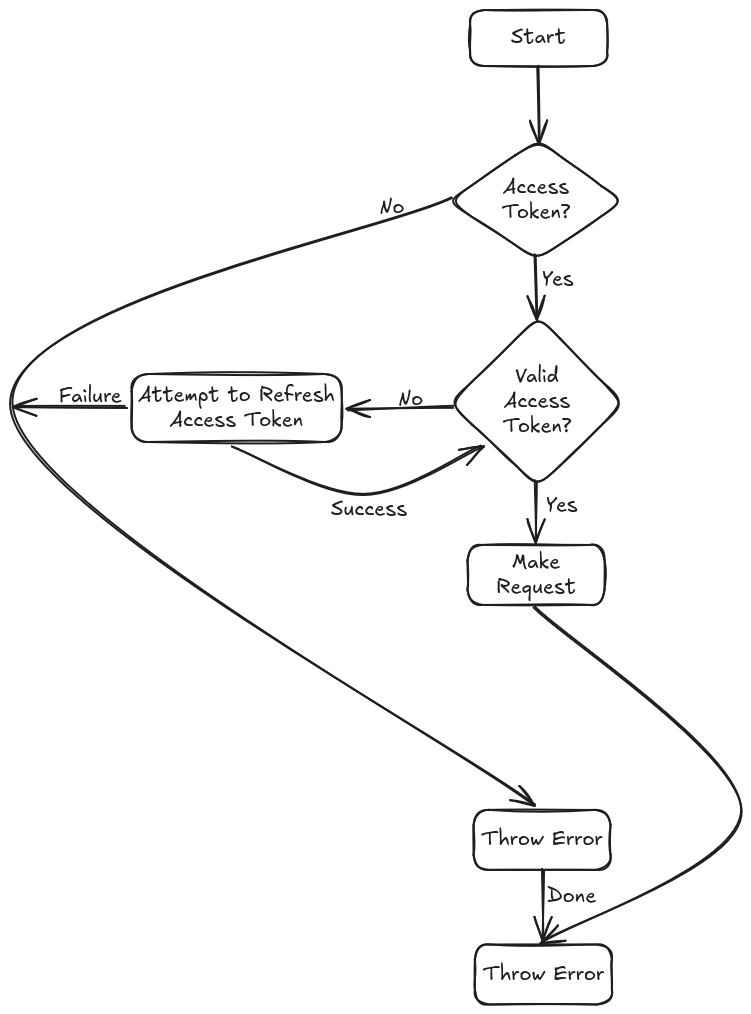
Figure 1: The diagram above provides a high-level overview of the JWT authentication flow we'll implement.
The Backend
JSON Web Tokens (JWTs) allow stateless authentication, meaning the server doesn't need to maintain session states. Instead, JWTs securely encode user details and permissions. We will begin by laying the groundwork for the authentication and authorization workflow for our frontend to utilize
Generating JWT Tokens
Upon successful login, JWTs are generated through these steps:
- Prepare the Payload: Include user details (like ID, permissions) and token expiry metadata.
- Sign the Token: Digitally sign with a secret key to ensure integrity.
- Encode the Token: Resulting in a compact JWT string.
Here's our reusable JWT token generation class:
import os
from jose import jwt
from datetime import timedelta, datetime, timezone


class JWT:
    def __init__(self):
        self.expiry_time = int(os.environ.get('TOKEN_EXPIRY'))
        self.access_token_expires = timedelta(minutes=self.expiry_time)
        self.refresh_token_expires = timedelta(days=self.expiry_time)

    def create_tokens(self, data: dict):
        """
        Create JWT access token for user authentication.

        Args:
            data: Dictionary containing data to encode in token
            expires_delta: time  for token expiration

        Returns:
            str: JWT token
        """
        to_encode = data.copy()
        if self.access_token_expires and self.refresh_token_expires:
            access_expire = datetime.now(timezone.utc) + self.access_token_expires
            refresh_expire = datetime.now(timezone.utc) + self.refresh_token_expires

        # Create Access Token
        to_encode.update({"exp": access_expire, "token_type": "access_token"})
        access_token = jwt.encode(
            to_encode,
            os.environ.get('SECRET_KEY'),
            algorithm=os.environ.get('ALGORITHM')
        )

        # Create Refresh Token
        to_encode['exp'] = refresh_expire
        to_encode.update({"token_type": "refresh_token"})
        refresh_token = jwt.encode(
            to_encode,
            os.environ.get('SECRET_KEY'),
            algorithm=os.environ.get('ALGORITHM')
        )
        return access_token, refresh_token
Implementing User Login Flow
The login endpoint process:
-
User Lookup: Queries the database and returns an error if no user is found.
-
Password Verification: Uses bcrypt to verify passwords securely.
-
Token Generation: Issues access and refresh tokens, storing the refresh token in the database.
oauth2_scheme = OAuth2PasswordBearer(tokenUrl="login/")
JWT = JWT()

@router.post('/login/', response_model=Token)
async def login(user_data: UserLogin, db: Session = Depends(get_db)):
    """
    Authenticate user and return access token.
    Args:
        user_data: Login credentials
        db: Database session
    Returns:
        Token: JWT access token
    Raises:
        HTTPException: If credentials are invalid
    """
    user = db.query(Users).filter(Users.email == user_data.email).first()
    if not user:
        error.send_not_allowed("Invalid user or password", headers={"WWW-Authenticate": "Bearer"}),


    password = user_data.password.get_secret_value().encode('utf-8')
    if not bcrypt.checkpw(password, user.password.encode('utf-8')):
        raise HTTPException(
            status_code=status.HTTP_401_UNAUTHORIZED,
            detail="Invalid Username or Password",
            headers={'WWW-Authenticate': 'Bearer'}
        )


    access_token, refresh_token = JWT.create_tokens(
        data={'sub': user.email, 'user_id': str(user.user_id)}
    )
    user.refreshToken = refresh_token
    db.commit()
    return {"access_token": access_token, "refresh_token": refresh_token, "token_type": "bearer", "user": user, "id": user.user_id}
Once tokens are issued during login, you can secure your endpoints using those tokens.
Key Concepts:
-
The line
token: str = Depends(oauth2_scheme)is what secures the endpoint.- It tells FastAPI to expect a Bearer token in the
Authorizationheader. - If the token is valid, the request proceeds.
- If the token is missing or invalid, FastAPI automatically returns a
401 Unauthorized.
- It tells FastAPI to expect a Bearer token in the
-
If the token is expired, you can catch the
ExpiredSignatureErrorand explicitly raise a401response.- This is important because it triggers the refresh token flow which we will handle in a second
Protecting API Endpoints with JWT
Secure FastAPI endpoints by simply using OAuth2 dependencies:
oauth2_scheme = OAuth2PasswordBearer(tokenUrl="login/")

@router.post("/secure-example")
async def secure(token: str = Depends(oauth2_scheme)):
    try:
        ...
        request logic
        ...
    except ExpiredSignatureError as e:
        raise HTTPException(status_code=401, detail="Token has expired")
In this example:
- The endpoint is protected by the OAuth2 token scheme.
- If the token is expired, a
401is raised, prompting the client to use the refresh token to get a new access token.
Refresh Logic
we will begin by looking the users database model schema:
class Users(Base):
    __tablename__ = 'users'
    user_id = Column(Uuid, primary_key=True, index=True)
    email = Column(String, unique=True, nullable=False, index=True)
    password = Column(String, nullable=False)
    refreshToken = Column(String, nullable=True)
We are storing the refresh token because it is single-use—once an access token is refreshed using a refresh token, that refresh token becomes invalid. Therefore, we must generate and issue a new refresh token each time the access token is refreshed.
By storing the latest valid refresh token in the database, we can:
-
Ensure that old refresh tokens are invalidated
-
Prevent token reuse (a common security vulnerability)
-
Maintain control over user sessions (e.g., logout from all devices)
Other Strategies for Managing Refresh Tokens:
-
Sliding Expiration Tokens
- Refresh tokens have an expiration time that gets extended with each use.
- Tokens expire after a fixed period of inactivity rather than a fixed duration from issuance.
-
Use of JWT Refresh Tokens with Blacklisting
- Encode refresh tokens as JWTs and store only the blacklisted (revoked) tokens in a database.
- This reduces DB reads but requires a solid revocation strategy.
Refresh implementation:
@router.post("/refresh")
def refresh(request: RefreshRequest, token: str = Depends(oauth2_scheme), db: Session = Depends(get_db)):
    payload = jwt.decode(
        token,
        os.environ.get('SECRET_KEY'),
        algorithms=[os.environ.get('ALGORITHM')],
    )

    if payload.get("token_type") != "refresh_token":
        error.send_not_allowed("Error", headers={"WWW-Authenticate": "Bearer"}),

    user_id = request.user_data
    user = db.query(Users).filter(Users.user_id == user_id, Users.refreshToken == token).first()

    if not user:
        error.send_server_error("Something went wrong")
    # Create new tokens

    user_data = {
        "sub": payload.get("sub"),
        "user_id": payload.get("user_id")
    }

    access_token, refresh_token = JWT.create_tokens(data=user_data)

    user.refreshToken = refresh_token
    db.commit()

    db.refresh(user)

    return {"access_token": access_token, "refresh_token": refresh_token, "token_type": "bearer"}
The backend is now prepared to handle user sessions securely, the next step is integrating these endpoints with our frontend application built using Next.js. We'll explore how Next.js efficiently consumes these JWT tokens and manages session persistence.
Note: To further enhance this applicaton security I would recommend implementing rate-limiting.
The Frontend
Now that we've established the foundation, we can leverage our endpoints to implement proper authentication for users. Our two primary objectives are:
- Creating sessions to securely store user information (including JWT access and refresh tokens)
- Implementing request handling that follows the standard JWT authentication flow
Creating user sessions
For our implementation, we'll use NextAuth.js to create and manage sessions that store JWT tokens and handle the complete authentication flow. While this implementation supports both Google OAuth and Credentials authentication methods, we'll focus on the Credentials approach that works with our previously defined login endpoint. The OAuth implementation follows similar principles with additional configuration requirements.
import NextAuth from "next-auth";
import GoogleProvider from "next-auth/providers/google";
import CredentialsProvider from "next-auth/providers/credentials";
import { NextAuthOptions } from "next-auth";

export const authOptions: NextAuthOptions = {
  providers: [
    GoogleProvider({
      clientId: process.env.GOOGLE_CLIENT_ID!,
      clientSecret: process.env.GOOGLE_CLIENT_SECRET!,
      authorization: {
        params: {
          access_type: 'offline',
          prompt: 'consent',
        },
        },
    }),

        CredentialsProvider({
                name: "Credentials",
                        credentials: {
                        email: { label: "Email", type: "email" },
                        password: { label: "Password", type: "password" },
                        },
                        async authorize(credentials) {
                        try {
                                const response = await fetch(`${process.env.BACKEND_SERVER}/users/login`, {
                        method: "POST",
                        headers: {
                                "Content-Type": "application/json",
                                },
                                body: JSON.stringify({
                                email: credentials?.email,
                                password: credentials?.password,
                                }),
                                });

                                const data = await response.json();
                                if (response.ok && data.access_token) {
                        // Return a properly structured user object
                        return {
                                id: data.id,
                                email: credentials?.email,
                                name: data.name || credentials?.email,
                                accessToken: data.access_token,
                                refreshToken: data.refresh_token,
                                };
                                }
                                return null;
                                } catch (error) {
                                console.error("Auth error:", error);
                                return null;
                                }
                                },
                }),
],
Here we define the authentication providers supported by NextAuth. The CredentialsProvider adds a custom form-based authentication flow with these key components:
name: Specifies how the provider appears in the UI (when using default pages)
credentials: Defines the expected authentication fields (email and password)
authorize(): The core function that handles user verification by making a request to our backend login endpoint
   callbacks: {
        async jwt({ token, account, user, trigger, session })
    {
        // Handle both Credentials and Google provider
        if (account || user) {
            token.accessToken = account?.access_token || user?.accessToken;
            token.idToken = account?.id_token;
            token.refreshToken = account?.refresh_token || user?.refreshToken;
            token.email = user?.email || token.email;
            token.name = user?.name || token.name;
            token.userId = user?.id;
        }
        if (trigger === 'update') {
            return {...token, ...session.user}
        }

        return token;
    },
The jwt callback allows us to modify the content of the JSON Web Token used to persist user sessions when using the "JWT" session strategy. This function runs whenever a JWT is created or updated.
        if (trigger === 'update') {
            return {...token, ...session.user}
        }
The trigger === 'update' condition is particularly important as it enables us to refresh user tokens later and update the session with new values. When we need to update the tokens (after refreshing them), we can use the update session method and pass new values that will be merged into the token.```ts
      async session({ session, token }) {
            // Ensure session user object is properly structured
            session.user = {
                ...session.user,
                email: token.email,
                name: token.name,
                accessToken: token.accessToken,
                refreshToken: token.refreshToken,
                id: token.userId,
            };
            return session;
        },
    },

...
It's important to note that NextAuth.js callbacks flow in sequence: the token returned from the jwt callback is passed to the session callback. This allows us to construct the session using the values we've stored in the token, which will then be securely stored in the user's cookies.
export function LoginForm({
                              className,
                              ...props
                          }: React.ComponentPropsWithoutRef<"div">) {
    const router = useRouter()
    const [email, setEmail] = useState("")
    const [password, setPassword] = useState("")
    const [errorData, setErrorData] = useState<string|null>(null);

    const handleSubmit = async (e: React.FormEvent) => {
        e.preventDefault()
        try {

            const response = await signIn("credentials", {
                redirect: false, // Prevents auto redirection
                email,
                password,
            })

            console.log("Sign-in response:", response)

            if (!response?.ok) {
                if (response?.error === "CredentialsSignin"){
                    setErrorData("Incorrect email or password. Please try again.");
                }else{
                    setErrorData(response?.error || "Unexpected error occurred please try again later")
                }

                console.error("Login failed:", response?.error)
            } else {
                console.log("Login successful")
                window.location.href = "/protected"
            }
        }catch (error){
            setErrorData("Unexpected error occurred please try again later")
        }
    }
    return (...)
The LoginForm component leverages the CredentialsProvider to authenticate users with email and password credentials. When the form is submitted, it calls signIn("credentials", ...), which triggers the authorize() method defined in our NextAuth configuration. This makes a backend API request to validate the credentials.
By setting redirect: false, we prevent NextAuth from automatically redirecting the user after authentication, allowing us to handle success/failure cases manually and provide appropriate feedback to the user.
Custom Hook to handle jwt auth flow
import { signOut } from "next-auth/react";
import { Session } from "next-auth";


type HTTPMethods = "POST" | "PATCH" | "DELETE" | "GET";
type UpdateSession = (data?: any) => Promise<Session | null>;

async function AuthClient(
    url: string,
    method: HTTPMethods,
    session: Session,
    updateSession?: UpdateSession,
    body?: any

){
    if (!session?.user?.accessToken) {
        console.error("No access token available");
        await signOut();
        return;
    }

    try {
        // Make the request to the desired URL
        const response = await fetch(url, {
            method: method,
            headers: {
                Authorization: `Bearer ${session?.user.accessToken}`,
                "Content-Type": "application/json",
            },
            body: body ? JSON.stringify(body) : undefined,
        });
        // if response is okay return the json
        if (response.ok) {
            return await response.json();
        } else {
            // if access token is expired
            if (response.status === 401 && session?.user?.refreshToken) {
                // refresh the accessToken
                const refresh = await fetch(`${process.env.BACKEND_SERVER}/security/refresh`, {
                    method: "POST",
                    headers: {
                        "Authorization": `Bearer ${session.user.refreshToken}`,
                        "Content-Type": "application/json",
                    },
                    // TODO maybe send the refreshtoken through body
                    body: JSON.stringify({
                        user_data: session.user.id,
                    }),
                });
                // If the refresh works save the tokens are retry response with the new keys
                if (refresh.ok) {
                    const refreshData = await refresh.json();
                    const newAccessToken = refreshData.access_token;

                    // TODO investigate why this is showing a warnign
                    if (updateSession) {
                        await updateSession({
                            user: {
                                ...session.user,
                                accessToken: refreshData.access_token,
                                refreshToken: refreshData.refresh_token,

                            }
                        })
                    }
                    // Retry with the new token
                    const retryResponse = await fetch(url, {
                        method: method,
                        headers: {
                            Authorization: `Bearer ${newAccessToken}`,
                            "Content-Type": "application/json",
                        },
                        body: body ? JSON.stringify(body) : undefined,
                    });
                    // If response is good return the Json
                    if (retryResponse.ok) {
                        return await retryResponse.json();
                    }else{
                        const retryErrorData = await retryResponse.json();
                        throw new Error(retryErrorData.detail);
                    }
                }

            }
            const errorData = await response.json();
            throw new Error(errorData.detail || 'Error making API request');
        }
    } catch (error) {
        console.error("API request error:", error);
        throw error;
    }
}

export default AuthClient;
Following this implementation should feel intuitive if you understood Figure 1, as the hook follows that exact authentication flow. One important note is that this hook is fully customizable. For example, in scenarios where the flow in Figure 1 would typically result in a throw error, I've opted to call signOut() instead. However, you can easily adjust this behavior to fit your needs — whether that means showing a toast notification, redirecting to a specific error page, or retrying with fallback credentials. It’s designed to be flexible to suit your app's error-handling strategy.
Example usage
as you can see the hook needs:
- URL
- HTTP Method
- Session
and optionally:
- updateSession
- body
so first we will need to optain the user session. this can be done by wrapping your layout in the SessionProvider component
export default function RootLayout({ children }: { children: React.ReactNode }) {
    return (
        <SessionProvider>
            {children}
        </SessionProvider>
    );
}
use this in the component where we will be call the AuthClient hook it will give use the session and update params for our hook:
export default function Page() {
    const { data: session, update, status } = useSession();

    ...
Example
export default function ProfilePage() {
    const { data: session, update, status } = useSession();

    const fetchUserData = async () => {
        if (status === "authenticated" && session) {
            try {
                const userData = await AuthClient(
                    `${process.env.NEXT_PUBLIC_API_URL}/users/profile`,
                    "GET",
                    session,
                    update
                );

                // Use the userData here
                console.log(userData);
            } catch (error) {
                console.error("Failed to fetch user data:", error);
                // Handle error appropriately
            }
        }
    };
    // Call fetchUserData when needed
}
We have now encapsulating the entire auth flow in a reusable hook, you can keep your components clean and focused on their primary responsibilities while ensuring robust authentication throughout your application.
Known Issues
When building secure APIs that rely on access and refresh tokens for authentication, it's crucial to consider the implications of concurrent requests especially when it comes to refreshing expired tokens. One common issue that arises in high-concurrency scenarios is a race condition during token refresh operations. Here's a breakdown of how this problem occurs and why it's important to handle it carefully.
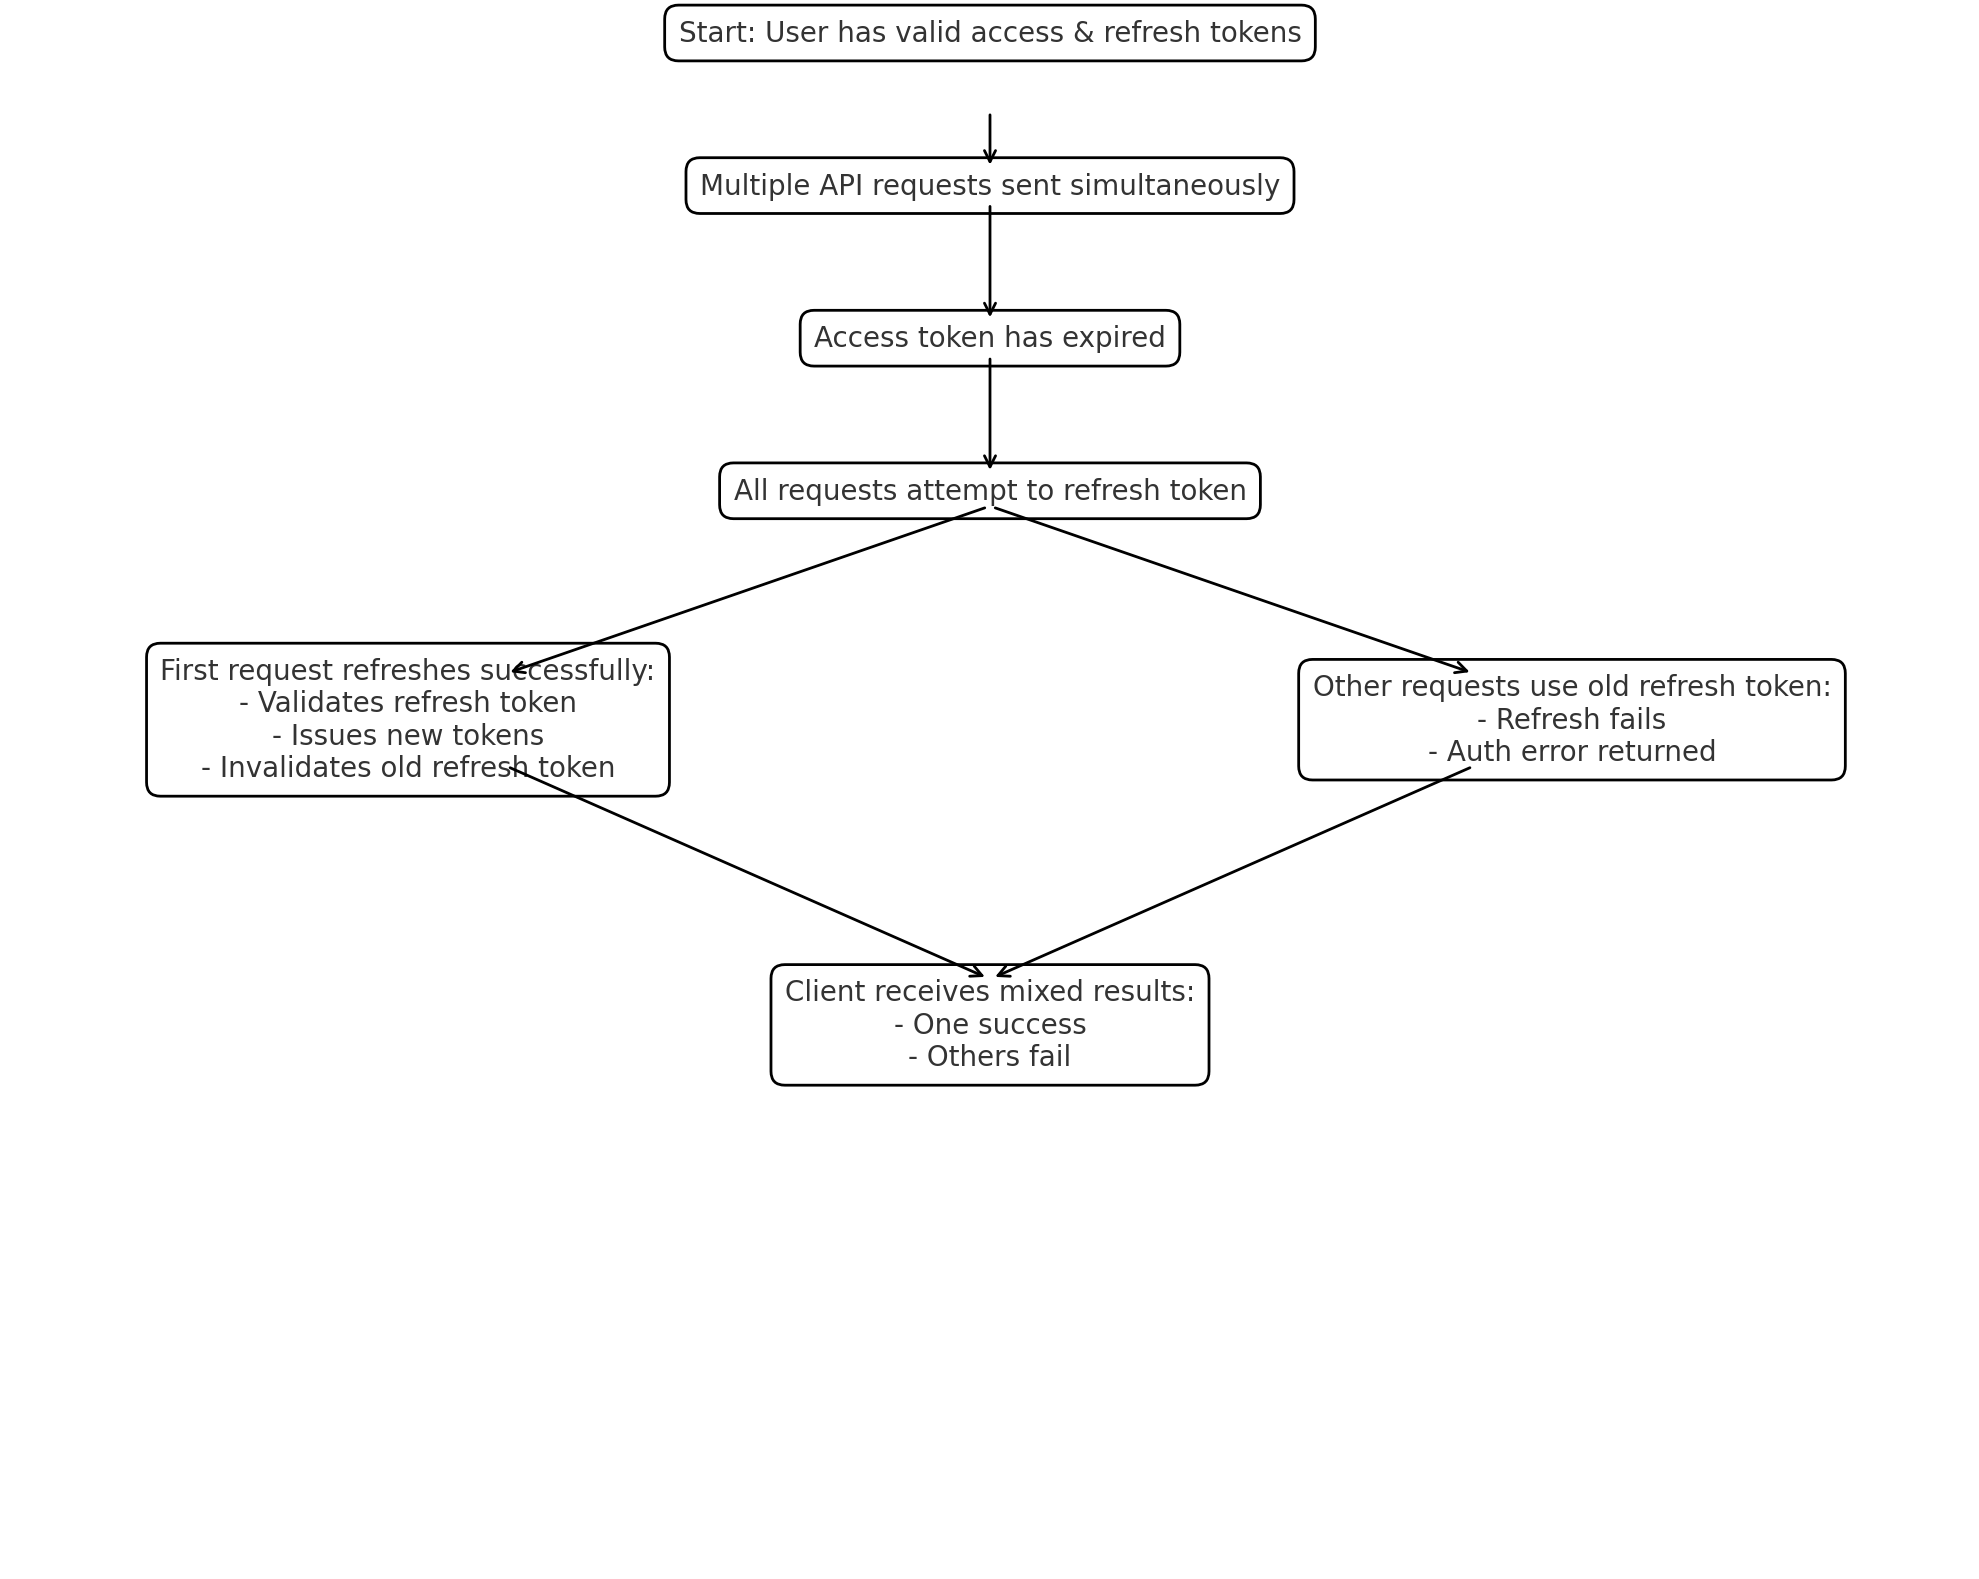 Figure 2: refresh race condition diagram
The Problem: Race Conditions During Token Refresh
Let’s walk through a typical scenario where this issue might surface:
-
Initial State
A user is authenticated and has an expired access token and refresh token. -
Simultaneous Requests
The user's client initiates multiple API requests in parallel, all using the same access token. -
Token Expiration
At the time of these requests, the access token has expired, triggering a token refresh in each thread of execution. -
First Refresh Success
One of the requests wins the race and successfully refreshes the tokens:
- It validates the current (original) refresh token.
- It issues a new access token and a new refresh token.
- It updates the database or token store to recognize only the new refresh token.
- It returns the new tokens to the client.
- Subsequent Refresh Failures
The other simultaneous requests, still holding the now-invalid original refresh token, attempt to refresh as well:
- Their refresh attempts are rejected because the original refresh token has already been invalidated.
- These requests fail with authentication or token expiration errors.
Why This Matters
This race condition can cause seemingly unpredictable authentication failures on the client side, especially in environments with parallel API calls (e.g., web apps with multiple components fetching data on load, polling multiple endpoints, etc...). Without proper handling, users may experience random errors, degraded user experience, or be forced to re-authenticate unnecessarily.
A solution
The most effective and straightforward solution I've found is simply ✨ retrying ✨ the requests. This works because, after a few retries, the request typically picks up the updated refresh token and proceeds as expected.
The simplest way to implement this is using TanStack Query (formerly React Query) with the useQuery hook:
const { isPending, isSuccess, data } = useQuery({
    queryKey: ['fetchLiveInfo', session, update],
    queryFn: async () => {
        const res = await fetch("endpoint here");
        if (!res.ok) throw new Error("Network response was not ok");
        return res.json();
    },
    retry: 5,
    retryDelay: (attemptIndex) => Math.min(1000 * 2 ** attemptIndex, 30000),
});
Closing Thoughts
I hope this solution helps you in your current projects, or maybe you can give it a try in upcoming projects and save you some time. If you have any improvements I would love to hear on them or if you have any questions I would be more than happen to help out. Reach out to me on X!!